Installer CAPMOX, talos CABPT et build d'image talos vm template
coolibra729 vues
4. Workload cluster avec talos control-plane et proxmox
- Installer talos control-plane provider
- Talos vm template pour proxmox
Installer talos control-plane provider
- Avant l'installation d'un autre provider, il faut faire le clean des anciennes installations et supprimser les namespaces.
clusterctl delete --all --include-crd --include-namespace --kubeconfig ~/.kube/management-kubeconfig
- Déploiement du cluster API Bootstrap Provider Talos (CABPT).
- Créer le fichier clusterctl-talos.yaml avec ce contenu
providers:
  - name: "talos"
    url: "https://github.com/siderolabs/cluster-api-bootstrap-provider-talos/releases/latest/bootstrap-components.yaml"
    type: "BootstrapProvider"
  - name: "talos"
    url: "https://github.com/siderolabs/cluster-api-control-plane-provider-talos/releases/latest/control-plane-components.yaml"
    type: "ControlPlaneProvider"
  - name: "proxmox"
    url: "https://github.com/ionos-cloud/cluster-api-provider-proxmox/releases/latest/infrastructure-components.yaml"
    type: "InfrastructureProvider"

## -- Controller settings -- ##
PROXMOX_URL: "https://10.10.10.105:8006"
PROXMOX_TOKEN: "root@pam!root-token"
PROXMOX_SECRET: "6b24c86d-cf71-461c-b2e6-a1362fd03c76"-
- Installer le provider
clusterctl init --infrastructure proxmox --target-namespace tolos-proxmox \
  --ipam in-cluster --control-plane talos --bootstrap talos\
  --kubeconfig ~/.kube/management-kubeconfig \
  --config clusterctl.yaml --addon helm
-
- Verifier l'installation
kubectl --kubeconfig ~/.kube/management-kubeconfig ns
kubectl --kubeconfig ~/.kube/management-kubeconfig get po -n capi-kubeadm-bootstrap-system
Talos vm template pour proxmox
Télécharger l'iso nocloud sur le site factory.talos.dev
Selectionner Cloud Server > Nocloud > amd64 > cocher les extentions:- siderolabs/qemu-guest-agent
- siderolabs/util-linux-tools
- dans Extra kernel command line arguments ajouter: net.ifnames=0 biosdevname=0
- Cette option permet de nommer les interface reseaux eth0 eth1 ...
Copier l'url de l'iso pour créer une vm proxmox et la transformer en template
https://factory.talos.dev/image/b351008e594665410397e570fceda48078faca5c9e5abb2fb855839f7f31479e/v1.9.5/nocloud-amd64.iso- Un exemple avec terraform
-
- Le provider proxmox: providers.tf
terraform {
  required_providers {
    proxmox = {
      source = "bpg/proxmox"
      version = "0.72.0"
    }
  }
}

provider "proxmox" {
  endpoint  = "https://10.10.10.105:8006/"
  api_token = "root@pam!root-token=6b24c86d-cf71-461c-b2e6-a1362fd03c76"
  insecure  = true
  ssh {
    agent    = true
    username = "root"
  }
}
-
- Le fichier vm.tf
resource "proxmox_virtual_environment_file" "user_data_cloud_config" {
  content_type = "snippets"
  datastore_id = "local"
  node_name    = "proxmox-node-01"

  source_raw {
    data = <<-EOF
    #cloud-config
    users:
      - default
      - name: admin-usr
        groups:
          - sudo
        shell: /bin/bash
        ssh_authorized_keys:
          - ssh-ed25519 AAAAC3NzaC1lZDI1NTE5AAAAIGNoeYxPOFEG9H70hmxRF66WL4MMVQ5XbQVNsXLsAdpo coul@home-lab
        sudo: ALL=(ALL) NOPASSWD:ALL
    bootcmd:
      - echo 'GRUB_CMDLINE_LINUX_DEFAULT="net.ifnames=0 biosdevname=0"' >> /etc/default/grub
      - update-grub
    runcmd:
      - apt update
      - apt install -y qemu-guest-agent net-tools
      - systemctl enable qemu-guest-agent
      - systemctl start qemu-guest-agent
      - echo "done" > /tmp/cloud-config.done
    EOF

    file_name = "user-data-cloud-config.yaml"
  }
}

resource "proxmox_virtual_environment_vm" "ubuntu_vm" {
  name        = "vm-template-talos-v1.9.5"
  description = "Managed by Terraform"
  tags        = ["terraform", "ubuntu"]

  node_name = "proxmox-node-01"
  vm_id     = 1000

  agent {
    # read 'Qemu guest agent' section, change to true only when ready
    enabled = true
  }
  # if agent is not enabled, the VM may not be able to shutdown properly, and may need to be forced off
  stop_on_destroy = true

  startup {
    order      = "3"
    up_delay   = "60"
    down_delay = "60"
  }

  cpu {
    cores        = 2
    type         = "x86-64-v2-AES"  # recommended for modern CPUs
  }

  memory {
    dedicated = 2048
    floating  = 2048 # set equal to dedicated to enable ballooning
  }

  disk {
    datastore_id = "local-lvm"
    file_id      =  proxmox_virtual_environment_download_file.latest_debian_12_bookworm_qcow2_img.id
    interface    = "scsi0"
    size = 20
  }

  initialization {
    ip_config {
      ipv4 {
        address = "dhcp"
      }
    }

    user_data_file_id = proxmox_virtual_environment_file.user_data_cloud_config.id

    user_account {
      keys     = [trimspace(tls_private_key.ubuntu_vm_key.public_key_openssh)]
      password = "admin" # random_password.ubuntu_vm_password.result
      username = "admin-usr"
    }
  }

  network_device {
    bridge = "vmbr0"
  }

  operating_system {
    type = "l26"
  }

  tpm_state {
    version = "v2.0"
  }

  serial_device {}
}

resource "proxmox_virtual_environment_download_file" "latest_debian_12_bookworm_qcow2_img" {
  content_type = "iso"
  datastore_id = "local"
  file_name    = "ubuntu-2204-kube-v1.32.qcow2.img"
  node_name    = "proxmox-node-01"
  url          = "https://swift.services.a.regiocloud.tech/swift/v1/AUTH_b182637428444b9aa302bb8d5a5a418c/openstack-k8s-capi-images/ubuntu-2204-kube-v1.32/ubuntu-2204-kube-v1.32.qcow2"
}

resource "random_password" "ubuntu_vm_password" {
  length           = 16
  override_special = "_%@"
  special          = true
}

resource "tls_private_key" "ubuntu_vm_key" {
  algorithm = "RSA"
  rsa_bits  = 2048
}

output "ubuntu_vm_password" {
  value     = random_password.ubuntu_vm_password.result
  sensitive = true
}

output "ubuntu_vm_private_key" {
  value     = tls_private_key.ubuntu_vm_key.private_key_pem
  sensitive = true
}

output "ubuntu_vm_public_key" {
  value = tls_private_key.ubuntu_vm_key.public_key_openssh
}

output "vm_ipv4_address" {
  value = proxmox_virtual_environment_vm.ubuntu_vm.ipv4_addresses[1][0]
}
-
- Lancer ces commandes pour créer la vm
terraform init
terraform plan
terraform apply
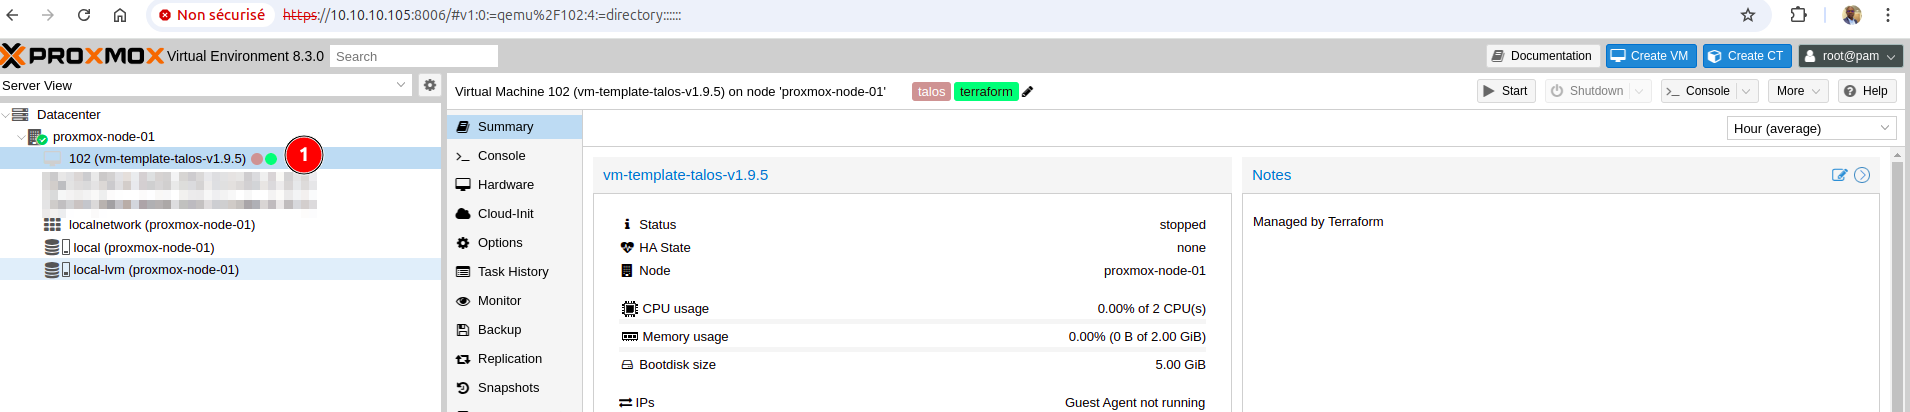
Cette image sera utliseée pour la suite.
Commentaires
Connectez-vous pour rejoindre la discussion.
Aucun commentaire pour le moment.